
What’s the weather like where you are? Create your very own neat printable weather station to hang on your wall and report today’s weather like an expert! This printable weather activity is a fun way to encourage kids to observe the weather everyday and learn how to describe it in words. Kids will find the dial and sliders fun to use. Follow our easy tutorial below to assemble the dial and the sliders.
The set includes 21 flashcards with words that describe the weather and children can pick 2 words for each day – like hot & dry, mild & breezy etc in combination with other indicators on the chart. Feel free to create your own cards and add them! Children can write, draw and decorate their own cards to use with this weather station.
How to make
my weather station
Although the instructions are long, it’s actually easy and quick to make! Just print the template and follow below!
Firstly, cut all the solid black lines including the holes and slits.
We ‘laminated’ small parts by covering them with clear tape so they don’t tear when used.
Making the movable arrow for the weather dial
1
Push the pivot through the small hole as shown below.
2
Now pass it through the hole in the red arrow. (We covered the surface of the arrow with clear tape before cutting the hole in the middle, folded the sides to give it a thickness and wrapped with more tape.)
3
Put a dab of glue on top of the pivot and attach the black pivot cover. Check if the arrow is moving smoothly. Done!
Making the sliding frame for the wind chart
Cut the 2 solid lines above and below ‘calm/breezy/windy’ on the main page.
Cut out the small blue frame shape (again, we ‘laminated’ the surface with clear tape) and cut all the solid lines to make 2 ‘flaps’ inside the blue frame. Push the white ‘flaps’ behind the cut strip on the main page. Put a small piece of tape at the back. Check if the frame moves left and right.
Making the temperature arrow slider
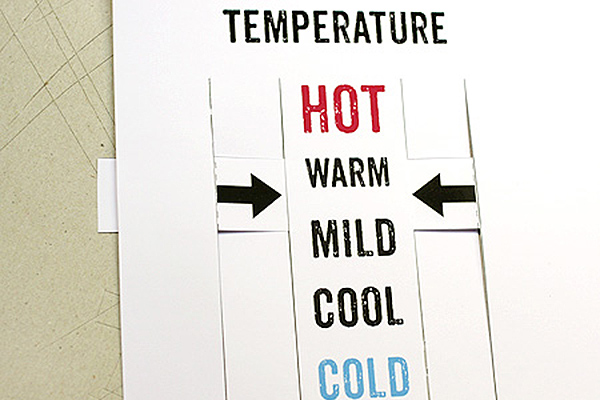
1
Cut the solid lines on the main page and weave the shape ‘A’ (marked on the template) through the slits so the black arrows show on the front as in the photo.
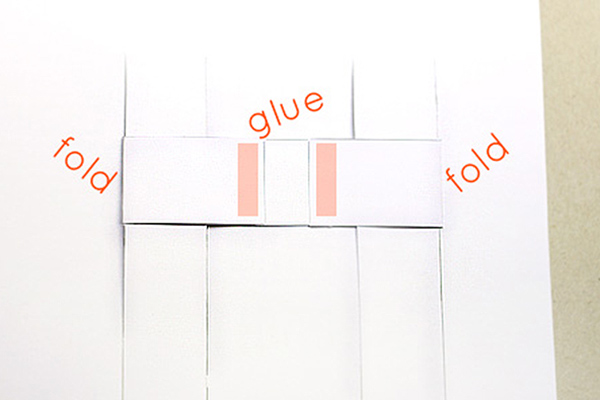
2
Turn the page over and on the rear side fold the sides of the shape ‘A’ over the strips towards the middle and glue the ends to secure. Don’t fold over the edges too tightly or get glue on the inside strip (it won’t move!). Check if it moves along the strip smoothly.
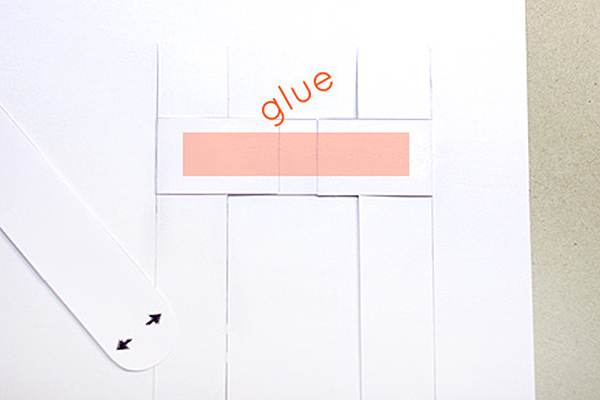
3
Now apply glue all over the back of it as shown.
4
And attach the shape ‘B’ print-side down.
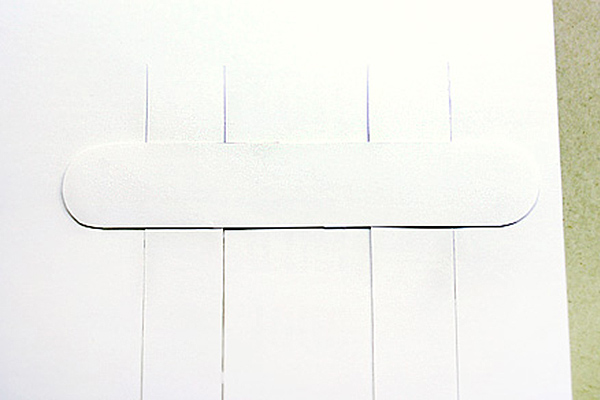
5
Turn the page over and pull out the sides of shape ‘B’ to the front. Fold them forwards so it’s easy to grab them. It should look just like this and move along the temperature slider up and down.
DOWNLOADS
Our free printables are strictly for personal use only.
By downloading you are agreeing to our Terms of Use .