Here are the supplies you’ll need to make one of your own!
- Fabric – I bought a metre of this hydrangea print, but the size you’ll need will depend entirely on the size of your mat
- Spray adhesive
- Piece of vinyl flooring (I got mine in a remnant bin for $2 at the hardware store)
- Scissors, pencil, ruler, tape measure, utility knife (in case you need to size your vinyl piece like I did)
- Duct Tape
- Hard bristle paint brush
- Polycrylic in a clear coat

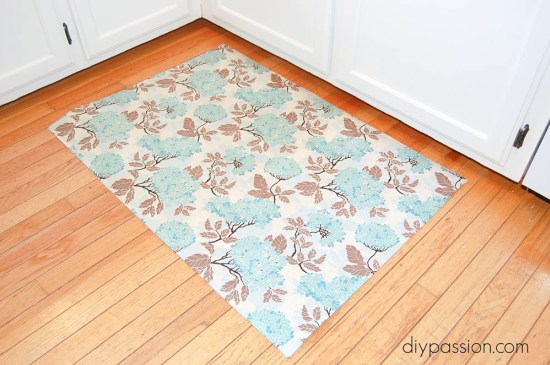
My mat is approximately 32 inches wide by 38 inches long. Then cut your fabric so that it’s 6 inches longer/wider than your vinyl. So my piece of fabric ended up at about 38 inches wide by 44 inches long. Once again, this doesn’t have to be exact.
Now spray your vinyl piece a couple of times with your spray adhesive and work quickly to place your fabric evenly on top. Make sure you really smooth out all of the big wrinkles and creases. You’ll have a couple minutes to do this before the glue really starts to set. After this step, I let mine sit for about 30 minutes.

Once the corners are down, use your Duct tape to secure all the visible loose ends. I used white tape because I had it, but regular grey tape works the exact same way – plus no one will see the bottom!
It’s starting to look like a mat now, right? But it still needs to be sealed so you can sweep it off with a broom and to give it a bit more ‘washability’. Using your hard bristle brush, coat the mat lightly with Polycrylic, making sure to only brush in one direction.
Once the mat is covered with one coat, you need to let it dry for 18-24 hours.
Do this step at least two more times. That means, it will take you a few days to get your mat in tip top shape.

Источник: DIY Custom Kitchen Mat